 Expert eBooks Courses | Online-eBook-Download.com Latest digital books and courses, Tips & Tricks, How-to guides, free ebooks, software discounts, coupons & much MORE… Instant Download

Photography requires skill and good eyes for capture-worthy moments or objects, photography is to have fun, joy and satisfaction. One such excitement is to be lurking in bushes with a big barrel waiting for tiny birds, while others prefer to spend many days on showing human relations and problems.
To make a perfect photo that will meet our expectations, we often need to use proven tricks to make the photos look more attractive, the scenery will be breathtaking, and the portraits will give character.
In this article we will try to present useful and interesting tricks and methods we can use to make our pictures more attractive for everyone to enjoy photography.
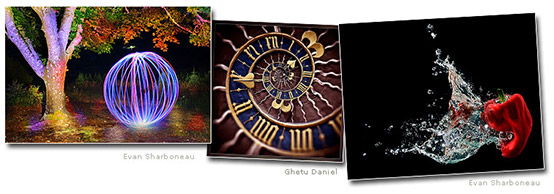
Light Painting
Light painting is a great fun, which can not only bring a lot of joy, but also extremely interesting results. The basics of light painting are very simple. Just set the camera on a tripod, set the ISO sensitivity to 400-800 and long shutter speed.
In your hand you need to have some source of light – a flashlight, a candle or even a cell phone with a large display and painted with letters, shapes, signs.
Due to the long exposure time, the light source will be recorded as light streaks. It is worth playing in the night. You need to wear dark clothes that will not be too noticeable in pictures.

The recipe for shooting with beautiful figures painted with light is very simple. You can get the same effect as the pros with experience and knowledge.
Zoom and Twist
Zooming or Zoom Effect as some describe this technique is a very interesting method to focus the viewer’s attention on one primary, central location.
You need a variable focus lens to mount. The exposure must be set for a long exposure time and the object or model on which you focus should be at the center of the image.
Almost immediately after pressing the shutter button, turn the focus ring in the lens – the greater the focal length of the exposure, the deeper the effect.
In this way, the central point remains unmoved and sharp, and the whole environment feels as if it merges and concentrates on it. In some cases, large flashes of light can be faked, somehow escaping from the central point. Even though such an effect is certain to be tacky, it should be used wisely in the hands of a wise photographer.
It’s great to emphasize the important element of a picture when there is a background around it that does not fit the frame. The blur will make the background blurry.
You will not be able to get the effect right away – you need to practice a little, beat the focal length with exposure time, aperture value or ISO sensitivity.
Accurate photographers sometimes also use rotation instead of zooming. This method, similar to zoom effect, involves rotating the entire camera around the center of the image instead of focal speed.
Panning
The panning technique gives you an interesting way to show movement in photos, add dynamics, speed. The object remains sharp and the entire surroundings are moved. Panning is often used to photograph moving vehicles, trains or running people.
To achieve this effect, you need to set a long exposure time. This type of photo is usually done by hand – focus on the main point to be sharp in the picture, and simply move the camera behind the subject.
Before we take a picture, it is worthwhile to trace the object – see what speed it moves in which direction. Ideally, speed and direction should be constant. Remember that the slower the speed of the object, the longer the exposure time must be and vice versa.
The method is not very simple – you have to practice a little before learning to adjust the camera’s movement to the speed and direction of movement of the object and exposure. In addition, any deviation from the movement path of the object or hand movement can completely destroy the effect.
Even seasoned photographers usually perform several or more photos in a series, one or several of which are successful. But practice and try it out – panning gives you a unique effect that, in an extremely dynamic way, can help you move your images.
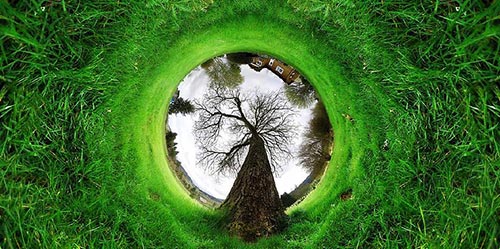
Tilt-Shift Effect
Tilt shift lenses allow the photographer to take extra control of depth of field. This leaves only a small portion of the picture sharp and the rest is completely blurred. Many tilt-shift images are made from high perspective.
This causes the recipient of the photograph to think that the distance is much smaller and sees the photographed objects as miniature. In addition, it intensifies the low depth of field that is normally obtained in macro photography, where small objects are taken very close.
Fortunately, a similar effect can be achieved in digital imaging software, such as Adobe Photoshop or Gimp.
Smoke Shooting
The art of photography with the smoke brings excellent, effective results, which may seem unattainable for a beginner photographer. Although the smoke is somewhat unpredictable, but when the right frame is caught, the effects may surprise you.
Contrary to appearances, photographing smoke is not so difficult and it is worth trying yourself.
You can find interesting pictures on the Flickr portal artsmoke.
Some photographs were created using powerful, studio flashes. Fortunately for our needs, it is simpler and cheaper equipment: normal flash, small backlight, small background of paper or another material, and of course a tripod and a smoke source..
The Orton Effect
It was originally made by putting two pictures in the slide – one very sharp and one very fuzzy. Today’s enthusiasts use Photoshop.
Orton’s name is derived from the name of the inventor, Michael Orton, from Vancouver Island, Canada. The first photographs of this type were made on film. Orton made two slightly overexposed photographs – one very sharp, using a large depth of field, and the other blurred.
He then superimposed the photographs on himself and joined in the slide. To make an “Orton slide sandwich”, it was necessary to use a tripod so that both pictures were the same.
In the days of digital photography, “Canadian sandwiches” can be created in a much simpler and cheaper way, and the effect is no different from the original. Anyone with a photo-processing program that supports layers (Adobe Photoshop, Gimp) can easily use this effect for his/her purposes.
 With Trick Photography and Special Effects 2nd Edition by Evan Sharboneau, you’ll learn how to take photographs that are beyond worldly and amazing.
Through this, you’ll learn long exposure effects, light painting, Photoshop techniques, improve your shots and create visual effects that are simply out of this world..
Learn how to create super-cool and Mind-Blowing images with Top Secret Photography Tutorials with step-by-step instructions and many more! Become unique, creative, and artistic by taking breathtaking photographs that blow people’s minds away!
It comes with 295 pages of instruction, 9 hours of how-to video tutorials, and contains over 300 creative photographs created by some of the most talented photographic artists around the world.
Dozens of rare trick photography ideas are included in this online photography course..
Start just minutes from now, because it’s available by instant download, no matter what time it is.
Download Trick Photography & Special Effects 2nd Edition right now, and get the photography tips and tricks mini-eBooks bonus kit at no extra cost..