 Expert eBooks Courses | Online-eBook-Download.com Latest digital books and courses, Tips & Tricks, How-to guides, free ebooks, software discounts, coupons & much MORE… Instant Download

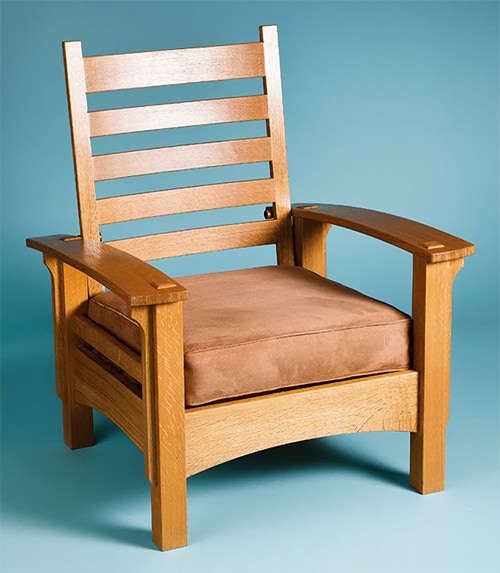
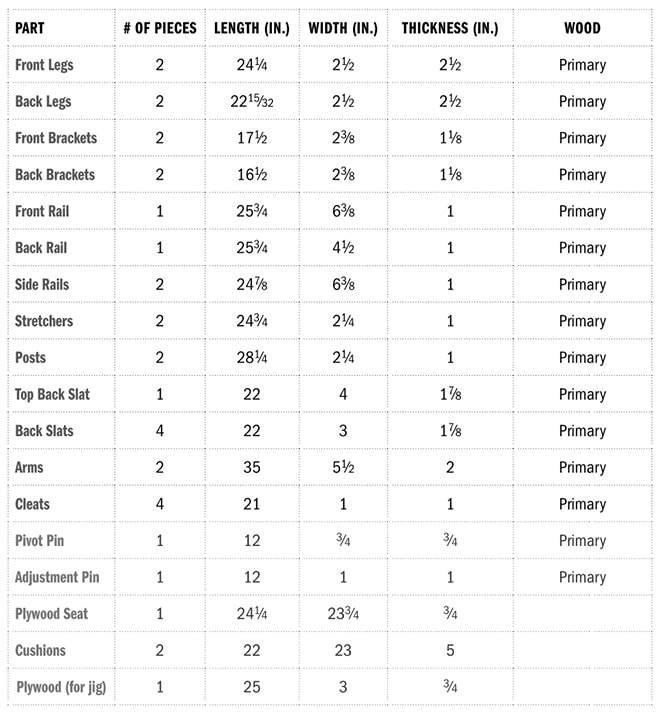
Craftsmen have been making chairs since before the time of the Egyptians, and they have been created in many different styles and materials. This classic armchair is inspired by Arts and Crafts designs, and it makes a great intermediate woodworking project.
The parts are relatively simple: four legs, stretchers, a back with curved slats, curved arms, and upholstered cushions for the seat and the back. The angle of the back can be adjusted for various sitting positions. The side stretchers slope downward slightly from front to back, putting the seat at a comfortable angle. Although that complicates construction somewhat, it’s well worth the effort.
Through-tenons at the top of the legs pop right through the arms, creating a great visual detail. The arm also slopes downward from front to back, giving the chair graceful lines.
Laying out and cutting the various curved parts is one of the challenges of this project, but it’s easier than you’d imagine. All it takes is basic shop tools and a jig for the router table.
The species of wood is another key part of the design. Although you could make this from cherry, walnut, or another hardwood, white oak is a traditional choice for this style chair, and that’s what we selected. To add even more dimension to the wood, we fumed the chair with ammonia, enhancing its figure and color.
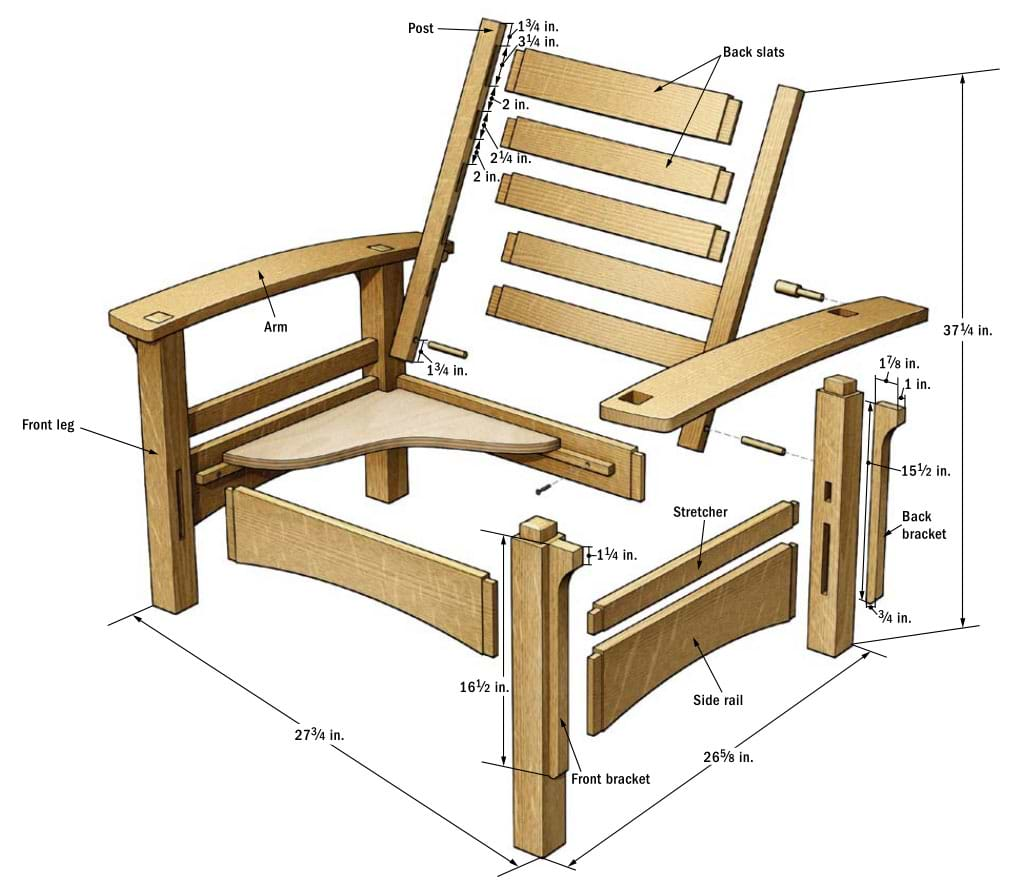
Armchair
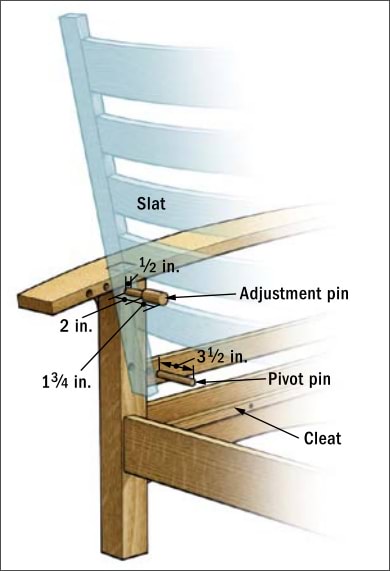
Corner Detail
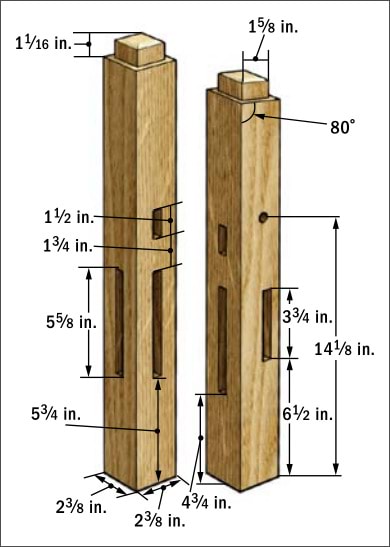
Leg Details
Slat Details

Materials List/Rough Mill
TOOL LIST
Power Tools
Bandsaw
Cordless drill
Drill press
Jointer
Mortising machine
Router table
Sander
Table Saw
Thickness planer
Hand Tools
Bench chisels
Bench planes
Combination square
Flexible steel ruler
Marking gauge
Spokeshave
Arm Profile
Stretcher and Bracket

Making the Legs
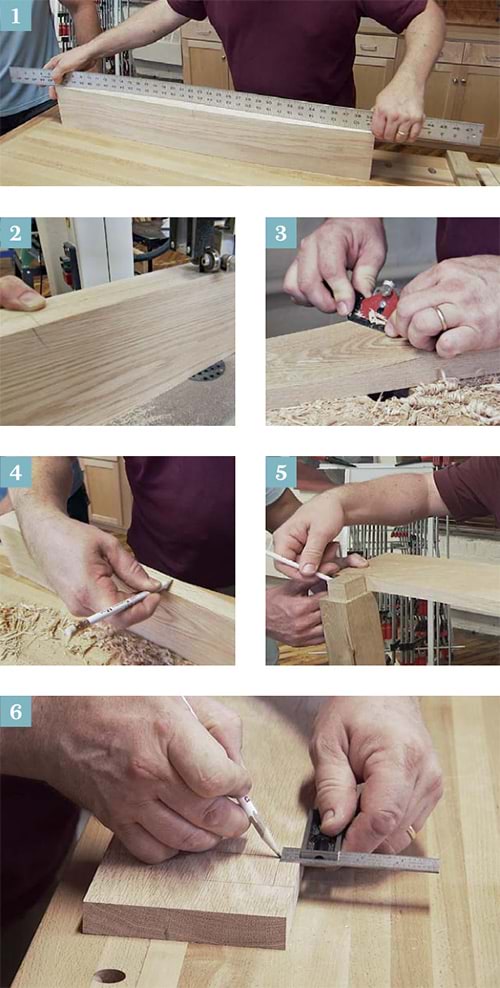
Once the stock for the legs has been finished to 2 ⅜ in. square and the legs cut to their finished lengths, the tops of the back legs must be cut at an angle so they fit the downward sweep of the arm. Set an adjustable bevel to 10 degrees (photo 1), mark the tops of both back legs (photo 2), and make the cuts on a chop saw (photo 3).
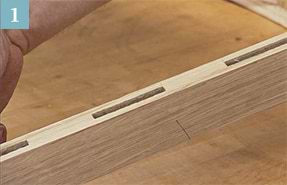
Lay out the mortises. To lay out all the mortises for the rails and stretchers, set a combination square to the distance between the bottom of the front leg and the bottom of the mortise for the side rail and mark the leg at that location. Then continue the square line across the face of the leg (photo 4). Use a longer combination square to mark the top of the mortise, indexing both layout marks from the bottom of the leg (photo 5).

Cut the mortises. When the length of the mortise has been marked on the leg, use a marking gauge to mark the width (photo 6). Then cut the mortise with a mortising machine, making sure you set the depth adjustment and fence correctly (photo 7).
Continue laying out and cutting the mortises on all four legs. All of the mortises are ½ in. wide and ⅞ in. deep.
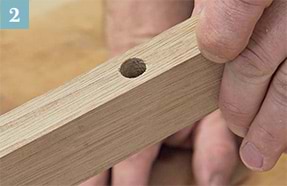
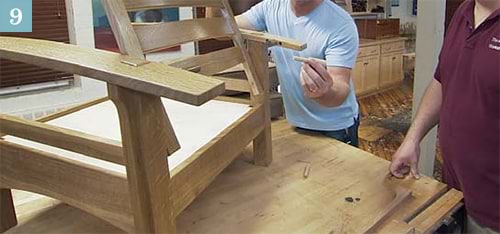
After cleaning up the inside faces of the mortises with a sharp chisel (photo 8), mark the location of the hole for the back rest pivot on the inside face of each back leg and bore the holes on a drill press (photo 9).
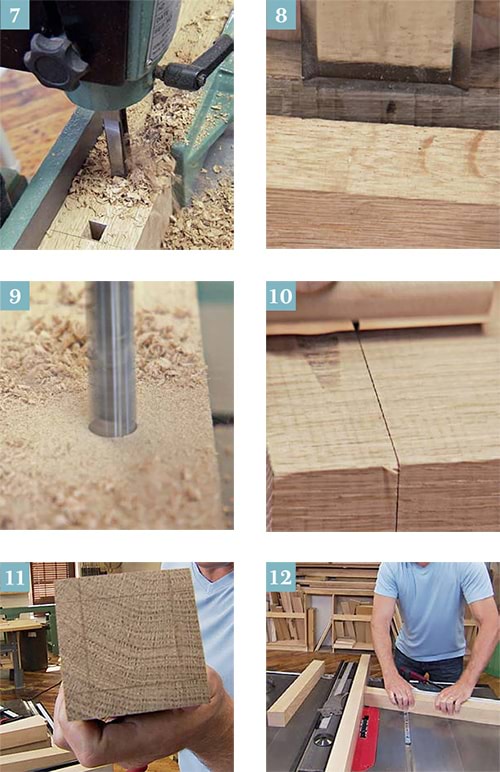
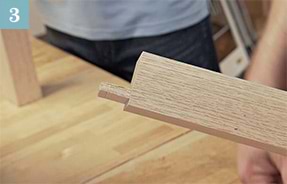
Tenon the legs. The last step is to cut the tenons on the tops of the legs. Start by setting a marking gauge about 3/16 in. more than the thickness of the arm and scribing all the way around the top of each leg (photo 10). Using a second marking gauge set at 3/8 in., scribe the ends of all the tops to define the cheek cuts (photo 11), and then use a dado blade on the table saw to remove the waste.
Remember, the miter gauge will be set at 90 degrees for the front legs, but because the back legs are cut at an angle, the miter gauge will have to be set to a matching angle of 10 degrees. Cut one side of the leg, flip the leg over, and readjust the miter gauge to 10 degrees in the opposite direction and make the second pass (photo 12).
Because of the angled top, the remaining waste (on the front and back faces of the leg) will have to be removed with a bandsaw or by hand. Clean up the cuts to the scribed lines with a chisel.
Making Stretchers and Rails
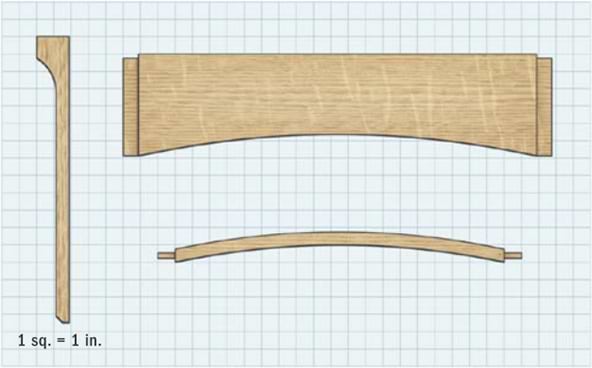
Both ends of the front rails are cut at 90 degrees. But the side rails and stretchers are cut at 2 ½ degrees to pitch the seat back and make the chair more comfortable.
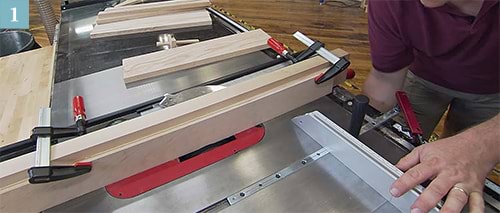
Cut the side rail tenons. To cut the tenons on the side rails and stretchers, set a marking gauge to 7/8 in., the length of the tenon, and scribe a line around the ends of one of the pieces. At the table saw, set the miter gauge to 2 ½ degrees.
If the dado blade is still set at 15/16 in. from when you cut the tenons for the legs, you can either change out the blades or you’ll need to attach a scrap piece of wood to make a sacrificial fence. The idea behind the sacrificial fence is that you can adjust the width, in this case to 7/8 in., and raise the dado blade up through the sacrificial fence until it reaches the proper height. Doing this will protect your primary fence (photo 1).
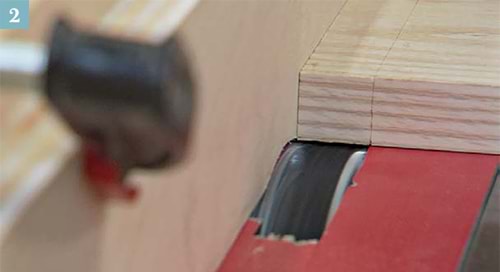
Set the blade height to 1/8 in., align the blade with the scribe mark, and cut all the outside faces of the rails and stretchers (photo 2). Next, flip the boards over, raise the blade, and make tests cuts on the back side until the tenons fit into the mortises. The depth of cut will be about 1/4 in. Remember that because of the angle you’ll have to readjust the miter gauge to make half of these cuts.
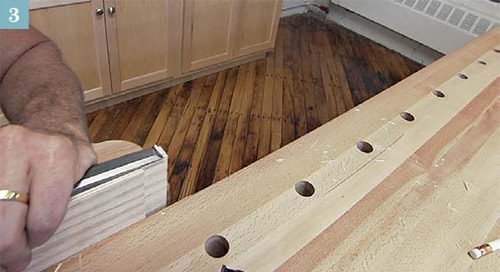
All of the tenons get a 1/4 in. shoulder on the top. In addition, trim the bottom edge of the back tenons on the side rails and stretchers so they’re perpendicular to the ends of the boards. This is easily achieved by working with a chisel at the bench (photo 3).
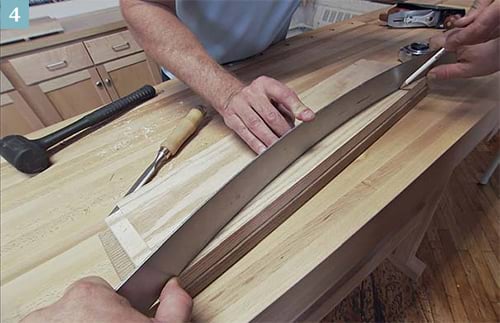
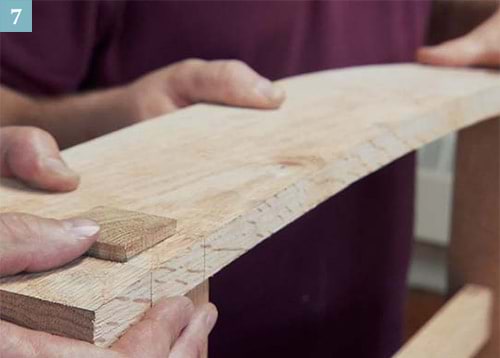
Add the curves. One of the design elements is a curve in the bottom of the side and front rails, which lightens the overall look of the chair. The curves are easy to lay out with the help of a flexible ruler (photo 4). Find the center of the rail, mark the highest point of the arc, and flex the ruler to meet this point. Having a second set of hands is a big help.
Make the cuts on a bandsaw and clean them up with a spokeshave (photo 5) and sandpaper.
Once all of the stretchers and legs have been cleaned and properly fitted to the mortises, it’s time to glue up the sides of the chair.
Making the Back
One of the nice features of this chair is the adjustable back, which consists of two posts and five curved slats. The back pivots on a 1/2 in. diameter pin.
Mortise the posts. The posts are 7/8 in. thick and 1 ¾ in. wide. They’re mortised along their length for the slat tenons (photo 1). Mortises are 5/16 in. wide, 1 in. deep, and centered on the posts. Mortises for the crest rail are slightly longer than those for the other four slats.
After cutting all of the mortises, bore the hole for the pivot at the bottom of each post (photo 2). The hole is drilled 1 ¾ in. up from the bottom of the post, drilled all the way through.
Tenon the slats. The curved slats start with stock that’s 1 ¾ in thick. Scribe the tenon locations with a marking gauge and remove the waste with a dado blade on the table saw. Cut the shoulder on the inside face at 7/32 in. (photo 3), then remove the waste on the outside face so the tenons fit the mortises (they’ll still need to be hunched).
Shaping Curved Parts
You can make curved furniture components by roughing them out on a bandsaw and then refining the shape with hand and power tools. The trick is making the parts uniform. Here’s how we did that with these slats.
At this point, the slats are still rectangular. To bring them to their finished shape, we start by making a jig (photo 1). The base is a piece of plywood cut to the curve. Two end blocks can be made on the table saw and will hold the tenons.
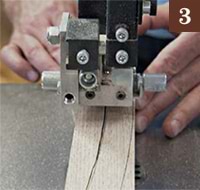
With the slat in the jig, the curves can be traced on one edge (photo 2). Take the slat out of the jig and cut it to rough shape on the bandsaw (photo 3).
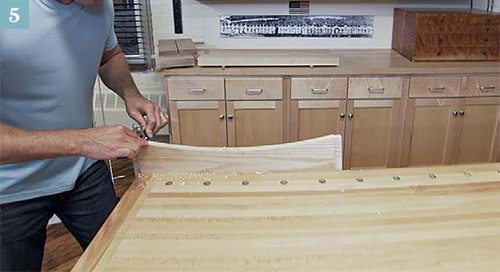
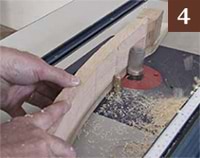
To finish the part, put the slat back in the jig and run it over a top-bearing bit on the router table (photo 4). With so much bit exposed, this is potentially a dangerous procedure, so be very careful to keep your hands clear and wear ear and eye protection as well as a dust mask.
Run the slat over the bit on both sides of the jig, flip the slat over, and make two more passes. The slats will still need to be cleaned up, but most of the work is done and the shapes will all be the same.
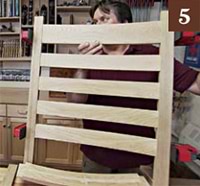
To remove the mill marks, you can use a sander, spokeshave, or whatever tool works best. When the slats are finished, glue up the back (photo 5).
Making the Arms
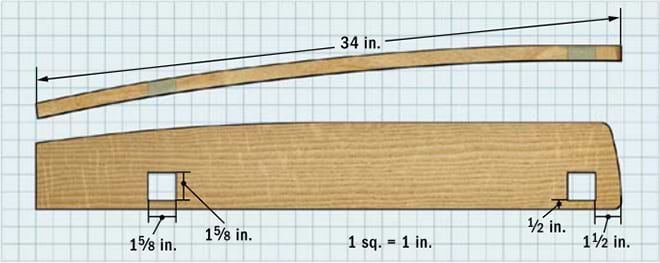
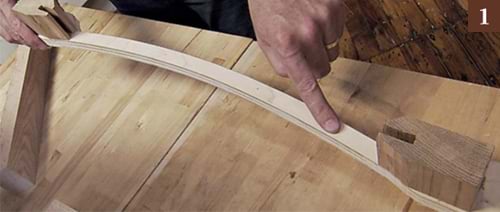
Draw the curves. The arms start as blanks 5 in. wide, 1 ⅞ in. thick, and 34 in. long. Find the midpoint of the arm, measure up 1 in. from the bottom edge, and then bend your ruler so it intersects the top mark and the two corners (photo 1). Draw the curved line, and then make the cut on the bandsaw (photo 2).
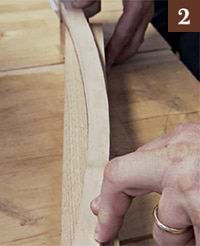
Clean up the cuts. Clean up the mill marks on the inside of the curve with a spokeshave or tool of your choice (photo 3). Then, using a square, marking gauge, or just your finger as a guide, mark off the top of the arm so it follows the curved side that you’ve just finished (photo 4). Cut out the curve on the bandsaw and clean up the saw marks.
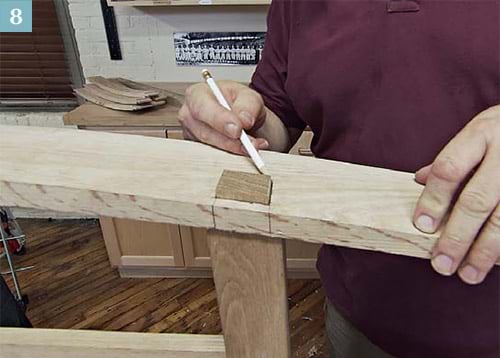
Mark the mortise locations. Now it’s time to mark the location of the mortises in the top of the arm to correspond with the tenons on the tops of the legs. Rest the arm on the shoulder cuts of the posts with 1 ½ in. overhanging the front and mark the locations for the tenons on the edge of the arm (photo 5). Then lay out the inside edge of the mortise 1/2 in. from the edge (photo 6).
Cut the mortises. Cut the mortises all the way through the arm, using the scribed lines on the edge of the arm as a guide for getting the right angle. Drill out most of the waste and finish up with a chisel, chopping out the waste from both sides.
Fit the arm. Now the arm can be fitted over the tenons (photo 7). With the arm in place, mark the tenons where they meet the top surface (photo 8). These marks will be your guide for beveling the tenons where they come through. Beveling is done with a chisel.
Shape the arm. To give the arm a more graceful look, lay out the curves on the front and the curved taper along the outside edge. Then carefully make the cuts at the bandsaw. Once the curves are cut, clean them up with a handplane and sandpaper and break all of the edges.
Glue up the chair. The rest of the chair can now be glued, with the exception of the arms. To attach the back, wax one end of the pivot pins and run the waxed ends through the posts and into the holes in the back legs. Apply glue to the trailing ends of the pins before driving them all the way into the posts. The back will pivot on the pins and come to rest on dowels fitted into the back of the arms (photo 9).
Finishing Up
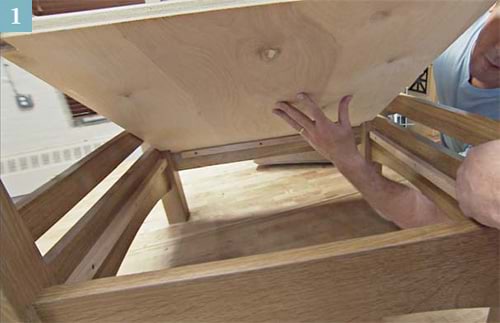
Add cleats for the seat. You’ll need to attach cleats to the inside edge of each rail, 1 ½ in. down from the top edge, to support the seat. Once they’re in, cut a piece of 3/4 in. plywood to fit, notching the corners around the legs (photos 1 and 2).
Set pin locations. To set the adjustment pins, you’ll first need to find a comfortable location for the back. By using a clamp as a stop, you can fiddle with the position until you find something you like. You’re then ready to lay out and drill 1/2 in. dia. holes 2 in. deep at each location. The pins are 4 in. long, with the first 2 in. cut to 1/2 in. dia. to fit the holes. The knobs of the pins are 7/8 in.
Now the arms can be glued in place and the brackets cut out and glued to the outside faces of the legs.
Sand and finish. When all glue residue has been removed, and all surfaces sanded smooth, apply the finish of your choice following the manufacturer’s instructions.
For this chair we used lacquer as the final finish, but before applying we made a tent for the chair and placed a bowl of household ammonia inside, a process known as fuming. The ammonia vapor colors the wood and gives it a beautiful tone. Be careful—this process can be dangerous. Make sure you read up on it before trying it, and take all appropriate safety precautions.
Instant Access to 16,000+ Easy DIY Woodworking Plans & Projects
Ever wanted to create woodworking projects easily and quickly?
How would you like to have thousands of Easy to follow organized woodworking projects and plans available to you anytime you wanted them! These custom woodworking plans are designed to get the job done quickly, inexpensively and with professional results EVERY TIME. You don’t have to be a carpenter or joiner to build beautiful woodworking projects!
In Ted’s Woodworking you will get everything you need:
- Instant Access to Thousands of woodworking designs, DIY woodwork projects, crafts, ideas & plans
- Step-by-Step details, plans, cutting & materials list and more…
- A Treasure Trove of Tutorials and in-depth woodworking training
- DWG & CAD Plan Viewer so you can edit and modify your plans
- Premium Woodworking Videos covering a wide range of topics, hosted by master craftsman
- How To Start A Woodworking Business Book – learn how to make money selling your custom woodwork
- Complete Woodworking Guides – over 200 pages of tips and tricks with detailed drawings and diagrams
- Lifetime FREE Monthly Plans – no recurring fees or other charges
This comprehensive woodworking package contains plans that is covered from head to toe. From clear, detailed step-by-step instructions and guides, and everything you need to know from blueprints and materials list is incredibly detailed. These plans will make woodworking a breeze!
Download Woodworking Plans
Here are some categories that are waiting for you:
Arbor Projects, Adirondack Chairs, Box Designs, Bed Plans, Bedside Cabinets, Bench Projects, Cabinet Plans, CD/DVD Holder, Chicken Houses, Children Rooms, Coffee Tables, Computer Desk, Crafts and Gifts, Door Designs, Entertainment, Furniture Plans, Fences, Frames, Gazebos, Greenhouses, Guitars, Hammocks, Home Office, Kitchen Projects, Lamps, Landscaping, Mirrors, Music Boxes, Outdoor Plans, Pergolas, Playhouses, Wooden Racks, Router Plans, Outdoor Sheds, Shelves, Small Homes, Storage Plans, Table Plans, Tool Boxes, Trellis Plans, Utility Buildings, Wooden Toys and Much More!